How to Install and Renew Let’s Encrypt Certificates on Alibaba Cloud Server
- 849Words
- 4Minutes
- 09 Jul, 2024
Let’s Encrypt is a free, automated, and open certificate authority (CA) that aims to increase internet security by providing free SSL/TLS certificates. This article will provide a detailed guide on how to install Let’s Encrypt certificates on an Alibaba Cloud server and use the Certbot tool to enable automatic certificate renewal.
Preparation Before Installation
Before installing Let’s Encrypt certificates, ensure that your server has Nginx installed and your domain name is resolved to the server’s IP address. If your server uses the Alibaba Cloud Linux system, you can install Nginx with the following commands:
1sudo yum install nginx -y2sudo systemctl start nginx3sudo systemctl enable nginxInstalling Certbot
Certbot is an automated client tool developed by EFF, used to obtain and install certificates from Let’s Encrypt. We need to use yum commands to install Certbot and its related components.
- Add the EPEL repository:
1sudo yum install epel-release -y2
3# If the above command fails, uninstall epel-aliyuncs-release first and then reinstall4sudo yum remove epel-aliyuncs-release -y5sudo yum install epel-release -y- Install Certbot and the Nginx plugin:
1sudo yum install certbot python3-certbot-nginx -yObtaining and Installing the Certificate
After installing Certbot, you can issue certificates for all subdomains with the following command, replacing example.com with your actual domain:
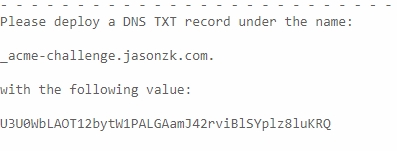
1sudo certbot certonly --manual --preferred-challenges dns -d *.example.com -d example.comThis command will ask you a series of questions and generate a txt record that you need to add to your DNS server, as shown in the image:
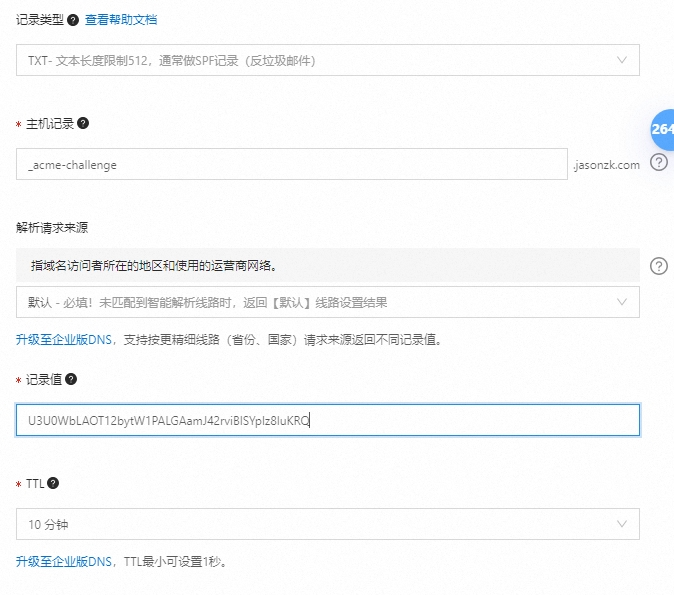
Go to Alibaba Cloud DNS resolution, find your current domain, and add a txt record with the value shown in the image above, as shown here:
Check if the DNS txt record is correct. Once verified, return to the terminal and press enter, as shown here:

After Certbot completes, your certificates and key files are usually stored in the /etc/letsencrypt/live/your-domain/ directory.
Edit the Nginx configuration file to use the new SSL certificate, usually located in the /etc/nginx/conf.d/ directory.
1sudo vim /etc/nginx/conf.d/www.confAdd the following code, replacing yourdomain with your actual domain:
1server {2    listen 80;3    server_name yourdomain.com *.yourdomain.com;4
5    # Redirect to HTTPS6    return 301 https://$host$request_uri;7}8
9server {10    listen 443 ssl;11    server_name yourdomain.com *.yourdomain.com;12
13    ssl_certificate /etc/letsencrypt/live/yourdomain.com/fullchain.pem;14    ssl_certificate_key /etc/letsencrypt/live/yourdomain.com/privkey.pem;15
16    ssl_protocols TLSv1.2 TLSv1.3;17    ssl_ciphers HIGH:!aNULL:!MD5;18
19    # Other Nginx configurations such as root directory, index files, etc.20    root /var/www/html;21    index index.html;22
23    location / {24        try_files $uri $uri/ =404;25    }26}
Reload Nginx with the following command:
1sudo systemctl reload nginxConfiguring Automatic Renewal
Let’s Encrypt certificates are valid for 90 days, so we need to configure automatic renewal to ensure the certificates remain valid. Certbot provides a cron job that can automatically check and renew expiring certificates.
Test certificate renewal with the following command:
1sudo certbot renew --dry-runYou may encounter errors because Certbot uses DNS to apply for domain certificates, so you need to update the DNS record during renewal. Directly using certbot renew will result in an error. We can use the [certbot-dns-aliyun] script to automatically call Alibaba Cloud’s interface to apply for and renew certificates.
Installing the Aliyun CLI Tool
1wget https://aliyuncli.alicdn.com/aliyun-cli-linux-latest-amd64.tgz2tar xzvf aliyun-cli-linux-latest-amd64.tgz3sudo cp aliyun /usr/local/bin4rm -rf aliyunConfiguring the User
Log in to https://ram.console.aliyun.com/, add a user, enable OpenAPI call access permissions, and add the AliyunDNSFullAccess authorization. Record the AccessKeyID and AccessKeySecret, and then execute the following command on the server:
1sudo aliyun configureFollow the prompts to fill in the corresponding information:
1Access Key Id []: AccessKeyID2Access Key Secret []: AccessKeySecret3Default Region Id []: cn-beijing4Default Output Format [json]: json (Only support json)5Default Language [zh|en] en: zhIf successful, the following will be displayed:
1Configure Done!!!2..............888888888888888888888 ........=8888888888888888888D=..............3...........88888888888888888888888 ..........D8888888888888888888888I...........4.........,8888888888888ZI: ...........................=Z88D8888888888D..........5.........+88888888 ..........................................88888888D..........6.........+88888888 .......Welcome to use Alibaba Cloud.......O8888888D..........7.........+88888888 ............. ************* ..............O8888888D..........8.........+88888888 .... Command Line Interface(Reloaded) ....O8888888D..........9.........+88888888...........................................88888888D..........10..........D888888888888DO+. ..........................?ND888888888888D..........11...........O8888888888888888888888...........D8888888888888888888888=...........12............ .:D8888888888888888888.........78888888888888888888O ..............If there are errors, check if OpenAPI call access permissions are enabled and AliyunDNSFullAccess authorization is added.
Installing certbot-dns-aliyun
1wget https://cdn.jsdelivr.net/gh/justjavac/certbot-dns-aliyun@main/alidns.sh2sudo cp alidns.sh /usr/local/bin3sudo chmod +x /usr/local/bin/alidns.sh4sudo ln -s /usr/local/bin/alidns.sh /usr/local/bin/alidns5rm alidns.shIf https://cdn.jsdelivr.net/gh/justjavac/certbot-dns-aliyun@main/alidns.sh cannot be downloaded, you can download it locally and upload it to the server.
Renewal
1# Test application2certbot certonly -d *.example.com --manual --preferred-challenges dns --manual-auth-hook "alidns" --manual-cleanup-hook "alidns clean" --dry-run3
4# Test renewal5certbot renew --manual --preferred-challenges dns --manual-auth-hook "alidns" --manual-cleanup-hook "alidns clean" --dry-run6
7# For actual application and renewal, remove the --dry-run parameter
Setting Up a Cron Job for Automatic Renewal
1crontab -eEnter the following content:
10 2 1 */1 * root certbot renew --manual --preferred-challenges dns --manual-auth-hook "alidns" --manual-cleanup-hook "alidns clean" --deploy-hook "nginx -s reload"This job will execute once at 2:00 AM on the 1st day of every month, renewing the certificates using the manual mode. After successful renewal, it will reload Nginx to apply the new certificates. In Crontab, the format of a scheduled task consists of five asterisks, representing minutes (0 – 59), hours (0 – 23), day of the month (1 – 31), month (1 – 12), and day of the week (0 – 7, where 0 and 7 both represent Sunday).
Conclusion
This article provided a detailed guide on how to install Let’s Encrypt certificates on a server, obtain and install certificates using the Certbot tool, and configure automatic renewal. By following these steps, you can ensure that your server always uses valid SSL/TLS certificates, enhancing website security.